recently

featured on

Entries in Uncategorized (42)

Saturday
Aug212010

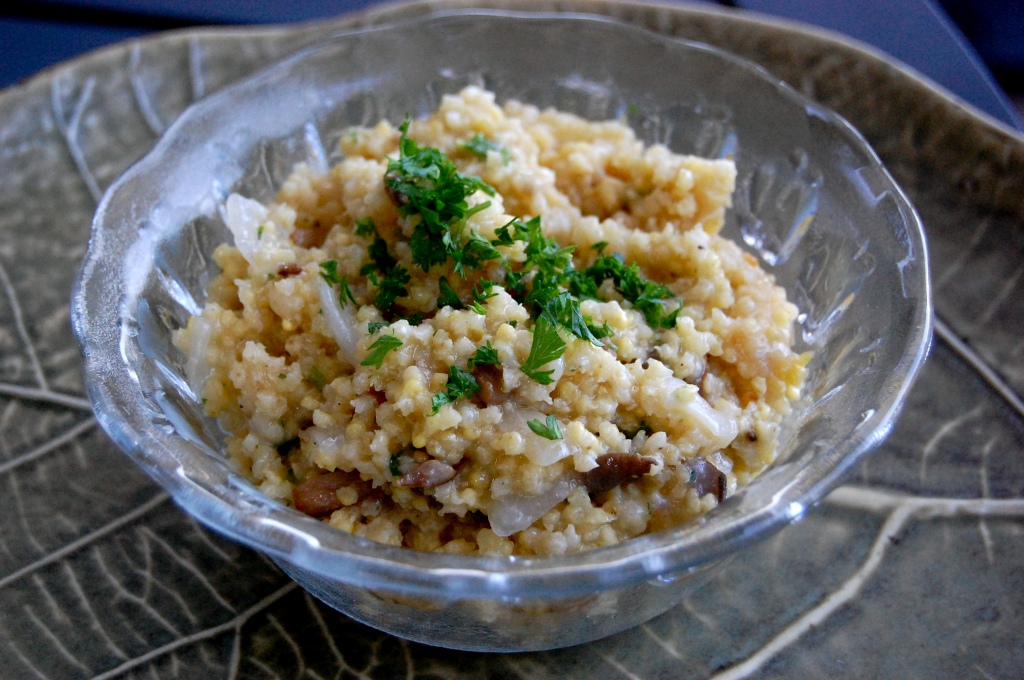
Lemony Mushroom Millet Risotto

Remember when I told you that improvisation sometimes leads me down a slightly more treacherous path? Last night was one of those times. Inspired by the "Farrotto"-farro mushroom risotto- at Barbacco on California Street, I set out to make something less traditional with the same earthy aroma and creamy, decadent flavor. The thing is, though, this Farrotto was probably the richest dish I have eaten in quite some time. I loved it, don't get me wrong- but I was still feeling it in the bottom of my stomach hours later.

Maybe that's just me though.

Nonetheless, lighter fare was in order for Friday night supper. I had just visited the bulk aisle at Whole Foods and come home with some millet, which I was eager to try. So after conducting a quick scan on the internet for general millet-cooking guidelines, I decided to try my hand reinventing Farrotto- via lemony mushroom millet risotto.


When it was all said and done, we sat down and I waited for Elliott, my most favorite critic, to give his opinion. He said it tasted a little plain- and I agreed. Even with plenty of s&p, parsley, lemon, wine and sauteed mushrooms, somehow it was still missing something. The salad we both enjoyed, a medley of textures dressed in lemon juice, olive oil, red wine vinegar and crushed red pepper. I was disappointed- my millet risotto had everything you might ever want to find in risotto, but we didn't like it. What's a hungry couple to do?


But then, something happened. Want to know what we did? We mixed them together. Yes we did. Want to know how it tasted? Delicious. I can't tell you how or why, because I don't know. I just know that it worked, and Elliott's tummy was slightly more satiated, which makes me immensely happy. (Side note: We still had to stop at Chipotle later, but that was bound to happen anyway. The guy eats three dinners as a general rule.)

I'm going to give you the recipe, and here's why: I need your help. I need the risotto to be able to hold its own against the best of 'em. Perhaps, if you make it yourself, you'll be able to guide me to whatever crucial ingredient I managed to exclude, or which important step I somehow forgot along the way. Mastering this dish is my new project, and you're invited. Let's begin.


Lemony Mushroom Millet Risotto


oyster mushrooms, as many as you want, roughly chopped


extra-virgin olive oil


1/2 yellow onion, chopped


1 cup millet


1/4 cup dry white wine


about 2 1/2 cups vegetable broth


1 zucchini, grated


1 small squash of choice, sliced thin


handful of cherry tomatoes, halved


1-2 cups baby spinach, chopped


1/4 cup walnuts, toasted


1/4 cup golden raisins


juice from 1/2 lemon


1-2 Tbsp. chopped fresh parsely


1 tsp. lemon zest


Instructions:


In a medium-sized saucepan, heat 2 Tbsp. olive oil over medium heat. Add onion and saute until soft, about 5 minutes. In a separate pan, saute mushrooms in 1 Tbsp. olive oil until lightly golden and set aside.


Add the millet to the onions and cook for 1 minute, stirring constantly. Add wine, simmer and reduce, stirring constantly. Start adding broth in 1/2-cup increments, letting it fully absorb before adding more. Stir occasionally. I wasn't keeping track, but I'm estimating it was about 2 1/2 cups liquid in total.


Toast walnuts and assemble the salad: zucchini, squash, tomatoes, raisins, spinach, and walnuts in a bowl. Squeeze 1/2 of a lemon over it, then 2 Tbsp. olive oil, 1/4 tsp. crushed red pepper, s&p, 1 Tbsp. red wine vinegar. Toss.


Back to the risotto: when you think you've added your last 1/2 cup of broth, turn off the heat and stir in lemon zest, mushrooms and parsley. Cover and let sit until the liquid is absorbed. Season with s&p, then taste it and decide for yourself what it needs. Serve alongside, mixed into, or atop the salad.


Thursday
Aug192010

A Day With Horses and a Recipe

This past Saturday, I spent a large portion of the daylight at the Menlo Charity Horse Show. This is somewhat of an end-of-summer tradition for me, where I can visit with old friends, watch the action and practice my photo skills. Most of you may not know that horses have played a big part in my life. I rode competitively for 9 years, and we currently keep three horses in our back-yard barn. Although riding and showing is now a thing of my past, I still enjoy it from the sidelines as a spectator.


a really beautiful pup

Naturally, to fuel my day I needed to have something really healthy and delicious. And if you haven't already figured it out, these two go hand-in-hand when I'm in the kitchen. Luckily, I'd made a batch of these cookies the night before (and eaten half of it in preparation for my morning long run). In a nutshell, this is why I love healthy baking: They taste sweet and indulgent, like cookies should, but they're also really nourishing and can double as a pre-workout snack. If you ask me, there's no way you could lose in this situation.


These morsels are vegan if you use vegan chocolate and gluten-free if you use GF oats. They have lots of chocolate, lots of fiber, plenty of protein and an irresistible sweetness and moist texture from ripe bananas. I highly recommend them as workout fuel, midnight snacks, midday snacks, dessert, breakfast, or just because. Or any other time, for that matter. They're that good.


Vegan Double-Chocolate Cookies


Many thanks to 101 Cookbooks for the inspiration.

3 large ripe bananas, mashed


1 tsp. vanilla extract


1/4 cup olive or coconut oil (if using coconut oil, warm it slightly to de-solidify)


2 cups rolled oats


2/3 cup almond meal (another product of my Costco bag of almonds)


1/3 cup unsweetened, shredded coconut


1/2 tsp. cinnamon


1 tsp. baking powder


6-7 ounces chocolate chips (I used 1/2 bar of super dark 85% chocolate, chopped, and about 1/2 cup milk chocolate chips. They contrast each other well.)


Directions:


Preheat the oven to 350 and place racks in the top third.


In a large bowl, combine the bananas, vanilla extract, and coconut oil. Set aside. In another bowl whisk together the oats, almond meal, shredded coconut, cinnamon, salt, and baking powder. Add the dry ingredients to the wet ingredients and stir until combined. Fold in the chocolate chunks and chips. Drop tablespoon-sized dollops of dough onto two parchment-lined baking sheets. Bake for 13-14 minutes, checking to make sure the bottoms don't burn. I cooked mine for close to 14 minutes and they could have stayed in a bit longer. Remove from oven, let cool, and enjoy!


Sunday
Aug152010

Eating Squirrel Food

The question aimed at me yesterday while being transported to my happy place via the fresh batch of nut bars I had just made was, "So how's your squirrel food?" The sharp-shooter was my sister, who routinely makes joke of my eating habits. Admittedly, they are quite similar to a squirrel's at times. I've also been accused by a friend of eating bird seed for lunch, but that's another story. Nonetheless, if what I was eating was indeed fit for a squirrel, then it's really no wonder the critters act insanely high. They're in love with their lives! They're also insanely fortunate, because these bars are the best damn things I've tasted in a while. I know I say that a lot, but believe me this time.


I baked them, as the recipe says is okay to do, however I'd actually recommend refrigerating them instead. They were a little too crumbly to transport from plate to mouth in one piece, a huge problem for me because I like to stuff my face. So whether you choose to bake them or not, chill for an hour before eating and they should be good to go.

The other great thing about them is that you can switch out any component for anything else your little heart desires. You've probably noticed that I'm attracted to recipes that allow for lots of creativity and wiggle room. I rarely make anything according to the original recipe, even on the first try. This has served me quite well for the most part, which is why I keep doing it. But of course, mistakes have been made too- you'll just see less of them here because that's embarrassing.


I must thank Green Kitchen Stories for the inspiration. Now, on with the recipe!

Granola Nut Bars


10 dates, diced

1/4 cup water

3/4 cup peanut butter

1 cup shelled pistachios, roughly chopped

1/4 cup old fashioned oats

1/4 cup quinoa

2 cups dried fruit, chopped (I used mulberries, figs, apricots, raisins)

Line an 8x8 glass baking dish with parchment paper, making sure parchment comes above all sides of the dish. Preheat oven to 350, if using. In a saucepan over low heat, heat peanut butter, water and dates. Add the rest of the ingredients and stir to completely coat. If the mixture is too thick, add more water. If it is too thin, add more peanut butter. Remove from heat and press into baking dish. Bake for 20-25 minutes if desired, or just chill for an hour for more sticky bars (make sure to chill for an hour even after you bake them). Remove from pan and slice into bars. Store in the refrigerator.
Thursday
Aug122010

Eggshell in my cookies

Yeah, that happened. I spent several minutes picking out microscopic shards from the batter a few days ago. I wasn't baking for myself or for you lovely readers, so you won't see them here. I just wanted to brag about how I am SUCH  a good friend because I would never gift sharp and pointy cookies, especially to people I like.

Let us all learn from my experience, and remind ourselves to crack eggs into a separate bowl before adding them to the dough! With the time you save by not having to extract shell pieces with tweezers, there are many and better things you could be doing. I'll let you use your imagination.

Alright, let's get down to the real business of this post: My favorite brown rice breakfast!


I have plenty of almond milk from my milking spree the other day, and two tupperware containers full of brown rice (because I'm one of those plan-ahead people), so it's only natural that I share with you what I've been eating to begin my day. I'll start by disclosing the hard facts.

Fact: This tastes incredibly good.

Fact: This tastes like if banana bread and rice pudding had a love child.

Fact: I love this breakfast like my own child. Of which I actually have none.

Fact: This is a really healthy and wholesome way to salute the sun.

Fact: You will feel really good after eating it because it is so healthy and wholesome.

Fact: My brother said "I like this." THIS IS A REALLY IMPORTANT FACT.


The great thing about using brown rice, oatmeal or quinoa as a base is that there are infinite combinations of flavors you could come up with. They are the perfect blank canvas for any and all random things you want to add in. The following is only what I've been making most recently.

You need:

1 cup cooked brown rice

1 banana, mashed or sliced thin

1 Tbsp ground flaxseed

1-2 dried figs or dates, diced

1/2 tsp. cinnamon, plus more to taste

1/2 + 1/8 cup almond milk

What you do:

Place all ingredients in a bowl and thoroughly combine. Microwave for 2 minutes. Stir, add more cinnamon, add any other desired toppings (coconut and blueberries for me) and eat up! Good morning!

Tuesday
Aug102010

Almond Milk

I love nut milk! Just crazy about it! What I could do without, however, are the additives like Riboflavin, various gums, and Carrageenan that store-bough milks have and don't do much for us in the health department.


Luckily, making your own nut milk is extremely simple! The most time-consuming part happens while you're sleeping. I suggest you all try it. It's so worth it to have fresh, preservative-free, frothy milk to use any way you like. I use mine in smoothies, in hot cereal, and for baking.

Watch, it's easy. And it only has 4 ingredients. Do it!

DIY Nut Milk

1 cup almonds

3 cups water

1/2 tsp. vanilla extract

honey

Start by combining the almonds and water. Let them soak for about 8 hours, or overnight. Next, pour it all in a blender. Add vanilla extract and honey to taste, then blend like crazy for about a minute. I alternate between the 'blend' and 'shred' settings on my blender. Then, pour it in batches through a mesh strainer:

Stir the pulp around and press down to release all the delicious milk you've just made. Save and refrigerate the pulp to use in smoothies and to make into nut butter! Once you've strained it all, pour into a large container and chill until ready to use.

See? Wasn't that easy? Soooo good for you.
Page 1 ... 2 3 4 5 6 ... 9 Next 5 Entries »